Old Walls
As any experienced old house renovator knows, there are the 5/3-3/5 rules to keep in mind. It means if you do the work yourself it will take 5 times longer and cost 3 times as much as your estimate. If you hire help it will take 3 times longer and cost 5 times as much. I learned this in my past. However, I discovered a few ways to tilt that rule in our favor when working with walls. What I show you here is meant to be used on the outer walls but elements of this method are also useful when working with wall partitions inside a house.
The customary way to upgrade a wall in an old house is to tear off the old materials out to the wall studs (collect the treasures hidden in there) insulate, rewire and add new wallboard, plaster or another interior finish. In our saltbox farmhouse I wanted to keep the structural integrity intact. Removing the double wallboard and the inner layer of sawn boards would diminish that advantage. I also dreaded the thought of all that mucky work.
The idea of straightening the old walls back to some resemblance to plumb and bringing the floors and ceilings to level with jacks, pulleys, sledgehammers and bulldozers, as I have done in the past, was out of the question. It would weaken the structure. Plumb and level are elusive goals in an old house anyway.
What I wanted were flat, plumb, insulated walls with new wiring and smooth new wallboard. So I decided to build them – right in front of the old walls, all around the inside perimeter of the house.
This is how you do it. Remove the mopboards, moldings, door and window casing trim, light fixtures, and all other protrusions from the wall. Seal all the cracks with builders foam. Make the old walls as draftproof as possible. Building a wall in one room at a time is advisable if you are living in the house during renovation. Make it one big project if you are wisely living elsewhere during construction.
It is best to start with a less used room first for practice. To avoid conflict with the irregularities in the old wall and to make room for R19 insulation, build the new wall at least 5 1/2 inches thick. Snap a chalk line on the ceiling the whole length of the room 5 1/2 inches out from the old wall. Between the chalk line and the old wall, use a 20D common nail and a hammer to punch test holes in the ceiling. Find all the joists up there and mark their locations. Attach a 2x4 plate against the ceiling, aligned with the chalk line, with drywall screws through the plate and on into the ceiling joists. Using a plumb bob, mark spots on the floor at each end of the room exactly under the 2x4 on the ceiling. Snap a chalk line between them and attach a 2x4 plate to the floor.
Install 2x4 studs on 24” centerlines across the whole room. This will be a little annoying. Each stud will be a slightly different length. They need to be tight and plumb so careful cutting, and perhaps some shimming, will be necessary. The extreme end studs should attach to the intersecting walls firmly even if they end up not being as plumb as the other studs. Please, for many good reasons, use screws for all of this work.
Now you have a stud wall that is straight, flat and plumb, though probably not square, but that is okay. At this point you can lay in the wires for your new electric outlets and lights for the wall. Putting the wires in the hollow space behind the 2x4 studs is one way. I’ll show you another in a little while. If there are other items, perhaps speaker or telephone wires or central vacuum system piping you want to put in, now is the time. Or not. Read on to see why.
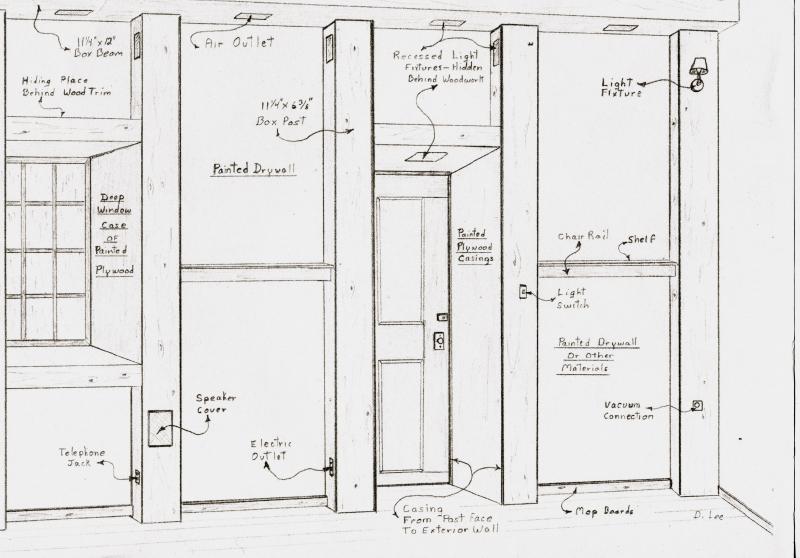
Attach the new wall studs to the old wall with blocks or other connectors for extra strength and stiffness. See the drawing. One connector on each stud about midway up the wall is plenty.
Fill the cavities between the wall studs with R19 fiberglass insulation. Paper backed or plain bats work fine. Stuff extra strips in the spaces behind the 2x4” wall studs for a little more insulation value.
Staple a 6-mil polyurethane vapor barrier over the studs and plates. From this point on, try to prevent any damage to this vapor barrier. Seal any rips or tears. It does not take much of a hole to allow water vapor to pass through the barrier and that would diminish efficiency.
Install 1x3 or 1x4 strapping, also known as furring strips, horizontally across the wall on 16” centerlines with a 1x6 or wider strip where the drywall seams will be. See the drawing.
I assumed from the beginning that the old wiring was unsafe and planned to install new wiring throughout the entire house. In this old house I mapped out all the old circuits and disconnected them one by one, by removing the fuses, as they were no longer needed. I ran all the new circuits to the location of the new service entrance, carefully labeling each one.
Try to coordinate all the wiring jobs to make it as convenient as possible for you and any other workers involved. It usually takes time to get an appointment with the power company. Be ready for them by having all the electric work done so that the electric company can disconnect the power from the old service and connect it to the new service during the same visit.
After the new service was connected and the old one was definitely disconnected I went copper hunting. I cut away all the old wiring that I had access to with cutters and pulled it out of the walls wherever I could.
The next step in the process is drywalling. I learned a new way to do this job, which saves a large amount of work and money and produces a perfectly smooth wall. There are other benefits as well, which I’ll get to later. This method can also be used in new home construction.
Keep your freshly delivered drywall free from any damage and handle it carefully. This is important.
Apply a heavy bead of construction adhesive along the surfaces of the appropriate furring strips to accommodate a panel of drywall. Using drywall screws, positioned every 6 to 8 inches and about 3/4” in from the edges, attach a panel of drywall onto the glued furring strips. Screw the panels only to the furring strips. It’s as simple as that. Now you have a big smooth section of wall that needs no tape, joint compound or that labor from Hell…sanding!
I have sometimes placed a clean piece of scrap board against the newly installed panel and leaned something, or someone, heavy against it for an hour or so to assure bonding of the adhesive if it looks like there is any bulging. That does not happen often but be aware that it can and check as you work. 1/2” is the standard thickness for drywall. 5/8” is better and I have seen installations of doubled 3/8” and doubled 1/2”. This is done to enhance fire safety.
The drywall panels can be installed with the long dimension vertical, leaving a seam every four feet. You can see this in the drawing. However, I recommend installing them lengthwise, running horizontally, also shown in the drawing. Drywall can be ordered in lengths up to 16 feet so you have options as to how much trim will be needed to cover the seams, which I will get to soon.
The next step is painting the wall. I like to paint my drywall panels before installing them. On a nice sunny day out on the driveway I can get three coats on 8 to 10 panels in a morning and afternoon and have them back in the house by dark with one helper. Applying the paint with a roller on panels that are laid out flat let’s me get thicker, more even coats of paint on the panels and the sun dries them quickly. Just pour the paint onto a panel and spread it with a long handled roller. No pan needed. Be sure the paint is well stirred. Paint makes the paper surface of drywall a little tougher and minimizes the risk of minor damage.
You may not have the option of painting the panels in advance. If not, just paint them in place as you would any wall. You can do this work using only a roller. You must stay away from the ceiling and floor two or three inches but this is easy. There is no fussy paintbrush work involved.
Use quality paints. The first coat should be a primer and then two or more coats in the color of your choice. Be careful, and do a good job painting. You will be looking at it for a long time. There are other wall covering choices you could make at this point. Using wallpaper or cloth comes to mind, or you could paint a mural on the new wall or do some texturing. Vinyl floor covering would be an interesting choice. The lower half of the wall could be wainscoting of wood or another material. There are plenty of design possibilities to think about.
At this point you have a perfectly smooth finished wall except for the seams. You could cover these seams with something as simple as battens of wood or some other material. I have used old barn boards for this purpose. Cloth wrapped battens look nice too.
After years of experience I decided the extra work of making box beams and box vertical posts with a box chair rail between, as shown in the drawing, is the best solution. It gives a very dramatic appearance to the wall. The projection of the beams and chair rails into the room tends to prevent damage to the wall by keeping furniture at a distance. The chair rail covers the horizontal drywall seam, no matter how long it is, plus divides the wall, permitting different treatments of upper and lower areas. In addition, the hollow places inside the beams, posts and rails are ideal locations for an assortment of equipment.
Ok, here is another way to route electric wiring, which I referred to earlier. The whole chair rail can be made removable for access to wires or for adding new items later. Cutting appropriate openings through the vertical posts at the chair rail intersections to allow passage of wires is necessary of course. The connected hollows form a grid of tunnels on your new wall, giving you the opportunity to run the wires for all your electric outlets, switches, light fixtures, vacuum cleaner pipes, speaker wires and telephone wires inside the beams, posts and rails (see drawing) without running any wires or equipment behind the drywall or the vapor barrier as is done in regular construction.
The switches, outlets and light fixtures can be installed in the woodwork of the beams, posts and chair rails, thus avoiding the need to breach the vapor barrier as is typically done. I like to recess simple light socket fixtures inside the beams and posts with cutouts that allow the light to indirectly illuminate the room. Fancier light fixtures can be mounted right on the posts.
Larger beams and posts can contain speakers. If you understand acoustics, there are ways to use the hollows in those places to enhance the quality of sound from your speaker system. That is something you can study on your own.
The top of the chair rail is a natural shelf. The spaces between the vertical posts are good locations for more shelves. Maybe chair rail to ceiling or even floor to ceiling shelves.
For convenience and quality of workmanship I like to build the beams, posts and chair rails in my workshop. Each beam, post and rail is a three-sided box. The fourth side of each box is a cleat (also called a batten) screwed to the wall over the seams in the drywall. This cleat must fit inside the box beam, post or rail just right so the “box” will be square when installed. Install cleats with screws, using a level for both the horizontal and vertical dimensions. Check the drawing. Your wires and other items that you want inside the beams, posts and rails should be attached to the cleats at this time.
When the posts and chair rails are ready, fit them over the cleats and use finish nails to secure them. This is where having plumb flat walls pays off. The posts and rails should snug right up to the wall. Here is a tip: later on if you must remove the beams, posts or rails, use a punch smaller in diameter than the finish nails, to push them right on through the boards. The beams, posts and rails can be removed and replaced without damage. Use new finish nails to reattach them.
In the drawing I have shown a mopboard at the bottom of the wall. It can be plain wood or something more. It could be a box shape too. The mopboards can be fitted around the posts as a nice detail. Of course they can conceal more items. This is a good place to run your telephone wires, avoiding the static interference that occurs when telephone wires are installed too near household wiring.
At the top of the wall I like to build a big box beam. It gives the posts and chair rails an even more dramatic effect and provides a large space for indirect lighting systems or a passage for air circulation from a furnace or air conditioner. In an old house, retrofitting air circulation ducts is always a difficult task. Pushing air through these beams around the perimeter of the home allows more complete circulation. Outlets can be cut where you need them in the face or underside of the box beam with grilles or registers installed to regulate airflow. It is even possible to build air passages from the beam cavity up into the second floor if you need them.
I’ve built systems of posts, chair rails and beams in two sizes…too small and just right. For vertical posts I make the front piece 11 1/4” wide of 3/4” thick #3 or #4 pine boards. This is the widest common sized planed lumber I can buy. The sidepieces are made from the same size board split down the middle with a table saw. This gives me a box 11 1/4” wide and about 6 3/8” deep. Plenty of gadgets can be built into the hollow of a post this size. There is little waste. The planed lumber looks good stained, painted, “distressed” (my favorite) or with whatever finish appeals to you.
The beam at the top of the wall is made of two 11 1/4” wide x 3/4” thick boards attached to cleats on the wall and ceiling. See the drawing. The beams, posts and rails do not have to match. Barn board top beams with planed lumber posts and rails are one option. This system offers many design possibilities for using different materials and plenty of options for things to hide inside the woodwork.
Walls usually have doors and windows and you will have to build your new wall around them. Doors look good surrounded by box posts and a small box beam above, leaving the old door unchanged. The same can be done with windows. In our old house the windows and doors were too old, inefficient and out of plumb to be accommodated this way.
I decided the best technique for managing our window problems was to install modern windows and new casings. I like to use simple thermopane glass panels in casings I build myself. Backwoods Home Magazine issue #100, page 53, has information on how to do this work as well as how to build vents in your walls.
You can use commercial windows if you like. The easiest way to get this done is to buy new windows that are smaller than the old windows. Our house had windows 38” wide x 52” high in most places. I bought glass that was 32” x 48” and built a painted plywood casing from my new wall, through the old wall (without having to cut away any of the old structure), and far enough out to allow for new wood trim around the new window on the outside of the house. Working from the structure of the new wall assured that the windows (and doors) would be plumb and level and work the way they should. The only demolition required was removing the old window sashes, quite easy considering their age and dilapidation. I did not even have to remove the old casement sash frame. Smaller windows save energy too.
An interesting result of this wall renovation is very deep windowsills. Ours averaged 18”. South facing windows became mini greenhouses. Others evolved into window seats. The sidewalls of the window cases were wide enough to hang plants, pictures and other things. The tops of the cases made good places for recessed lighting and there was plenty of room to attach shades and curtains. The deep cases gave the home the impression of living in a castle with thick walls.
Doors can be treated the same as windows. In our situation I wanted a larger door so I had to remove the old casing out to the jamb, but that was easy and gave us a little pile of kindling wood. Other than that, the job consisted of building a painted plywood casing that passed through the new and old wall, then installing the new door. During the construction of your new window and door cases, don’t forget to add insulation and a vapor barrier.
Let’s evaluate. This type of alternative renovation avoids much of the work that requires you to wear a Hazmat suit and gas mask. The new walls add considerable structural improvement to your home. Our old house was overbuilt but most renovators are not so lucky. Adding the strength of this type of wall without the need to demolish any structural parts of your Darling Derelict creates a safer work environment and a sturdier house.
If you have a truly valuable old house you would like to preserve but cannot afford to renovate it to its original splendor just now, leaving the old walls intact and adding these new walls means that in the future, after you win the lottery, you can remove the new walls and still have your Architectural Antique intact. I know of some very old log cabins spoiled for preservation by destructive renovation. I am sure there are plenty of other examples of treasured old homes ruined in this manner.
This wall work also greatly improves the energy efficiency of your home. The addition of modern insulation materials and methods to whatever protection the old walls had will save on energy bills for the life of the home. New wiring and the addition of other features I mentioned makes your home safer and more convenient.
Being able to do this work in phases is a big plus for Weekend Woodworkers. If you do your cutting, preassemblies and finishing in a shop or garage there is not too much disarray in the room where the wall is being put up. Build the wall when you can (even on rainy days) and live your lives fairly conveniently between work sessions.
Money is always an issue when it comes to renovation. Knowing you do not have the open-ended costs involved with demolition is good. The cost of hiring skilled labor to even up old walls and make new materials fit is so stressful that some people sacrifice quality work for quick and dirty fixes which don’t last. These new walls with beams, posts and chair rails and the no-tape-or-joint compound method of drywall installation saves money, labor and mess.
Renovating old walls this way means you won’t find the treasure troves left in them by the former owners but there is the attic, the basement, the staircase, ceilings, floors, outhouse and barn to search. Or there is always the lottery.
United States
About this blog:
The Fixer Upper
HOME SWEET HOME was embroidered on a framed sampler the living room at my grandpa and grandma’s farmhouse up on the mountain where we lived long ago and far from here.
Those were the first words of wisdom I learned to read, write and understand. Looking back today, I realize how this inspiring motto guided me throughout my life’s work of building my own home . . . sweet and truly mine. That plus my collection of bumper sticker wisdom.
I grew up, left home and explored various careers until I became qualified to teach Industrial Arts at my hometown high school. My plan to have my own home was in motion. I bought a modest little fixer upper at the edge of town. My intention was to fix it up, add an addition, live there awhile to make sure everything worked, sell it and finally start building my own home. I figured I could get most everything done during summer vacation. I was young and optimistic.
I learned a great deal from that first building project. So much that I’ll have to tell you more.
Meanwhile: THERE’S NO PLACE LIKE HOME